- Published on
- View count
- 682 views
How to add Google Analytics 4 to a Next.js website
- Authors

- Name
- Francisco Moretti
- @franmoretti_
Introduction
Hey devs, this guide will help you set up Google Analytics 4 on your Next.js website.
I did this to learn more about the demographics of people who visit my personal site. With an analytics solution, you can measure your online traffic and optimize your site to improve it.
I’m a big fan of Vercel and that’s why I hosted my site with them. But, their analytics solution is targeted toward commercial users. The best alternative I’ve found is Google Analytics. Google Analytics gives individuals a ton of metrics for free.
Some steps are needed to set up Google Analytics with Next.js
Most people don’t do the extra steps needed to set up an analytics solution. Here are some reasons that can intimidate developers:
- Most documentation is not Next.js specific.
- Google Analytics can be set in many places, not only on websites.
- There is no official documentation about how to add it to a site that already exists.
I’m going to show you how to overcome these issues and have a complete solution in a few easy steps. I was able to set up Google Analytics on my site in minutes.
Step 1: Set up a Google Analytics account
Your first step is to set up an Analytics account. If you already have one, skip to “Create a Google Analytics 4 property” unless you want to create a separate account for this website.
- In Admin, in the Account column, click Create Account.
- Provide an account name. Configure the data-sharing settings to control which data you share with Google.
- Click Next to add the first property to the account.
Step 2: Create a Google Analytics 4 property
A property is a set of Google Analytics reports and data for your website and/or app.
Enter a name for the property (e.g. “My Business, Inc website”) and select the reporting time zone and currency. Then follow the steps to complete the industry category and business size and hit “Create”.
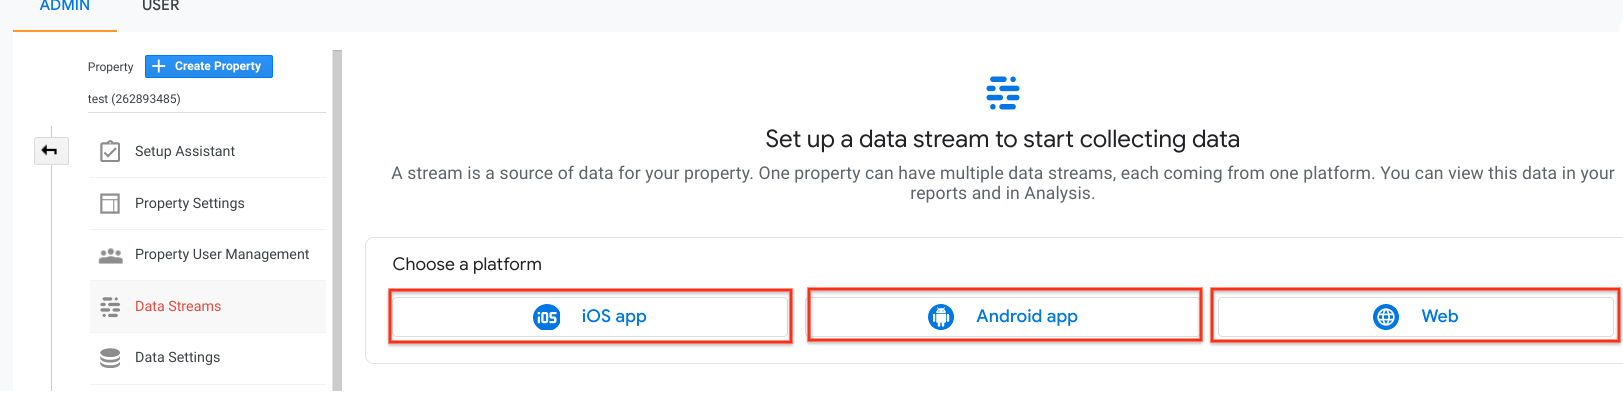
Step 3: Add a Data Stream
Click Web to add a new data stream for your website.
- Enter the URL of your primary website, e.g., “example.com”, and a Stream name, e.g. “Example, Inc. (web stream)”.
- You have the option to enable or disable enhanced measurement. Enhanced measurement automatically collects page views and other events.
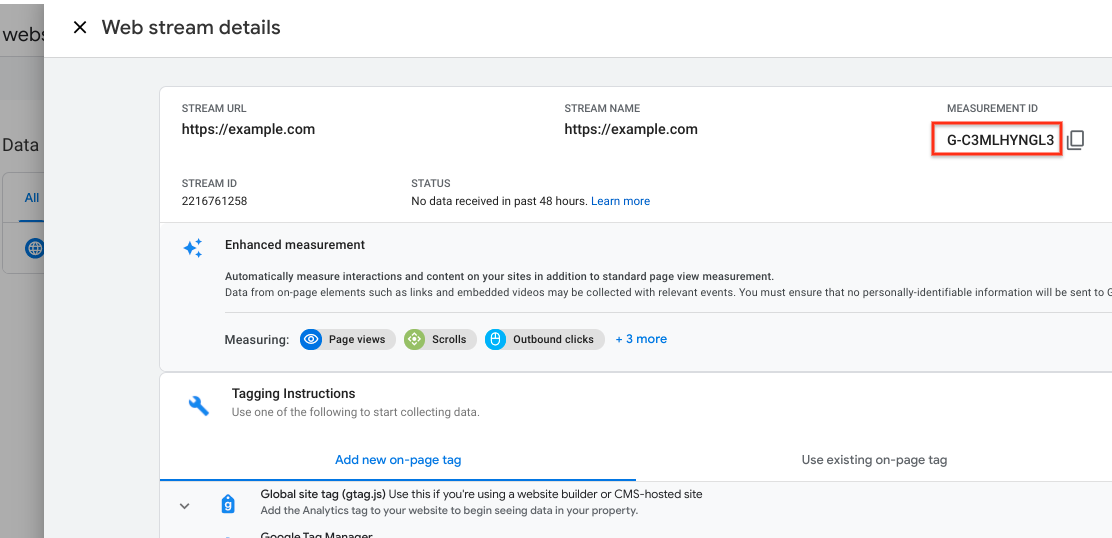
Step 4: Find your “G-” ID
Follow these instructions to find your “G-” ID. This ID will connect your website with your google analytics account. Save it somewhere to be used later as a secret ENV variable.
- Click Admin.
- In the Property column, check that you have your new Google Analytics 4 property selected, then click Data Streams, then Web. Click the data stream. Your “G-” ID appears at the upper right.
Step 5: Use Google Analytics on the Next.js site
Next.js makes this really easy by allowing you to create a custom _app to inject tracking snippet to every page to track pageviews and events.
Starting from Next.js 11 we have available the Next.js Script component. This is an extension of the HTML <script> element. It allows developers to set the loading priority of third-party scripts anywhere in their application, outside next/head, saving developer time while improving loading performance.
By using the strategy="afterInteractive" in the Script components the website performance is not impacted by Google Analytics.
Here is an official Next.js example that explains it.
For a new site
You can simply create a new site by using the Next.js example on the following link “Example app with analytics”.
Simply execute the following command
npx create-next-app --example with-google-analytics with-google-analytics-appFor an existent site
Modify the _app.js or file to use next/router and the gtag.js scripts like it’s shown on the following file.
import { useEffect } from "react"
import Script from "next/script"
import { useRouter } from "next/router"
import * as gtag from "../lib/gtag"

const App = ({ Component, pageProps }) => {
  const router = useRouter()
  useEffect(() => {
    const handleRouteChange = (url) => {
      gtag.pageview(url)
    }
    router.events.on("routeChangeComplete", handleRouteChange)
    router.events.on("hashChangeComplete", handleRouteChange)
    return () => {
      router.events.off("routeChangeComplete", handleRouteChange)
      router.events.off("hashChangeComplete", handleRouteChange)
    }
  }, [router.events])

  return (
    <>
      {/* Global Site Tag (gtag.js) - Google Analytics */}
      <Script
        strategy="afterInteractive"
        src={`https://www.googletagmanager.com/gtag/js?id=${gtag.GA_TRACKING_ID}`}
      />
      <Script
        id="gtag-init"
        strategy="afterInteractive"
        dangerouslySetInnerHTML={{
          __html: `
            window.dataLayer = window.dataLayer || [];
            function gtag(){dataLayer.push(arguments);}
            gtag('js', new Date());
            gtag('config', '${gtag.GA_TRACKING_ID}', {
              page_path: window.location.pathname,
            });
          `,
        }}
      />
      <Component {...pageProps} />
    </>
  )
}

export default AppCreate a new file called lib/gtag.js to encapsulate the code that uses the gtag property. This is what the new file should look like
export const GA_TRACKING_ID = process.env.NEXT_PUBLIC_GA_ID

// https://developers.google.com/analytics/devguides/collection/gtagjs/pages
export const pageview = (url) => {
  window.gtag("config", GA_TRACKING_ID, {
    page_path: url,
  })
}

// https://developers.google.com/analytics/devguides/collection/gtagjs/events
export const event = ({ action, category, label, value }) => {
  window.gtag("event", action, {
    event_category: category,
    event_label: label,
    value: value,
  })
}Step 6: Set the “G-” ID in the ENV variable
Finally, this step will connect the google analytics account with your site. As with any ENV variable, there are two places where you need to set up this ENV variable. Let’s go through each of them.
In your development environment
Let’s create the ENV variable NEXT_PUBLIC_GA_ID in our development environment.
First, create a file named .env with the following content on the root repository of your site.
NEXT_PUBLIC_GA_ID = 123Then, set your “G-” ID in the .env file. It should replace the value assigned to NEXT_PUBLIC_GA_IG (The placeholder value is 123).
At this point, you should be able to run your application locally and Analytics page visits on the real-time view of the Google Analytics property panel.
On your website host
My site is hosted for free on Vercel. To set up the NEXT_PUBLIC_GA_IG variable there I followed this guide.
Step 7: Changes needed for Typescript (optional)
If your site uses Typescript you might run into the following error
Property does not exist on type 'window & typeof globalthis'The easiest way to solve this is to create a new global type for Window with the missing properties.
Add the following interface to the global.d.ts file in your project. If you don’t have that file, just create one.
interface Window {
  gtag: (...args: any[]) => void
  dataLayer: Record<string, any>
}Don’t forget to add the file containing the snippet to your list of project files Typescript compilation. The file path should be set in the include section of tsconfig.json.
Find out more about tsconfig Include if needed.
Kudos to Emanuel Gautier for creating this article that showed me the solution to this issue.
Conclusion
Analytics is a critical tool for any website and it’s not hard to set up. Next.js makes it even easier and Google Analytics is a great free tool to understand a website’s traffic.
My website non track the visits to every page by time and region. I can get detailed reports and about the site’s audience and even a “Realtime” view.
At the same time, I can use this setup to learn more about the “Web analytics” field with the latest Google Analytics 4 technology.
I hope this was helpful for you as well!